Table of Contents
- 1 What Are Shopify Pages?
- 2 Types of Shopify Pages for Your Store
- 3 How to Add Content Pages on Shopify
- 4 How to Add a Collection Page on Shopify
- 5 How to Add a Product Page on Shopify
- 5.1 Step 1: Go to Products on the Lefthand Dashboard Menu
- 5.2 Step 2: Click the Add Product Button
- 5.3 Step 3: Add Product Title, Description, and Images
- 5.4 Also Read – How to Create a High-Converting Product Page on Shopify?
- 5.5 Step 4: Enter All Your Product Details
- 5.6 Step 5: Configure Page Visibility and Publishing
- 6 How to Customize Shopify Pages
- 7 Conclusion
- 8 FAQs
What Are Shopify Pages?
The backbone of your online store’s content and navigation are Shopify pages. They provide a whole website foundation by including crucial sections like the homepage, product pages, contact pages, and more. These pages serve a variety of functions and are essential to building an orderly and educational eCommerce website. With the help of professional Shopify website development services, although modification has some restrictions, they may be customized using Shopify’s theme editor, and they adapt to the theme you choose.
Many of them are free, making it simple to experiment with page appearance. Due to Shopify’s responsive design, its pages appear fantastic on all devices. These features are meant to make it easier to utilize the platform, build stores, and deploy websites quickly. Let’s now examine in more detail the specific purposes and efficiency of each page.
You may design a variety of page kinds in Shopify for your online business to engage customers and efficiently communicate information. Here are the various Shopify page kinds.
Types of Shopify Pages for Your Store
1. Shopify Homepage
The key is the Shopify home page. If it is not visually pleasing and useful, visitors may quit your website shortly. Fortunately, Shopify’s theme editor offers a wide range of homepage modification choices. While all Shopify sites allow some level of customization, the homepage gets the most focus in terms of adaptability and individualization. As a starting gateway for future sales, make it your primary priority.
Make use of Shopify’s theme editor. Remember to save modifications before posting. Customized options on the left are reflected in the live preview on the right. Theme customization possibilities differ, so pick one that complements your brand and take the time to make your Shopify homepage right so that it looks good and clearly communicates what you want to say.
2. Shopify Collection Pages
Shopify collection pages are crucial for categorizing and displaying your product categories so that your customers have an easier time purchasing. Utilizing these pages efficiently may seem intimidating if you’re new to Shopify.
3. Shopify Product Pages
Shopify product pages give you a platform to display your products with gorgeous images, customizable options, transparent prices, shipping information, and in-depth descriptions. Remember that a customer’s last stop before making a purchase is frequently the product page. It could be harmful to your company if it fails at this crucial time. You can fine-tune this important page with some themes’ additional customization options provided through the theme editor.
4. Shopify About Us Page
The About Us pages on Shopify are more than just a task to cross off your website to-do list. They are incredibly important in the e-commerce sector because they let you tell your site visitors the human side of your brand. Consumers crave deep ties with the companies they support in today’s interconnected world, making the About Us page a key medium for communicating your company’s identity and mission.
5. Shopify Contact Us Page
A critical component of contemporary eCommerce is customer support. But how can you help your consumers if they can’t get in touch with you? The solution is on the Shopify Contact Us page. This Shopify page should provide more information than just the usual contact and location information. In fact, it may be a fantastic platform for building up your brand narrative, offering FAQs, or obtaining email subscriptions.
6. Shopify FAQ Page
Shopify’s FAQ section is essential for maintaining and assisting online customers. This website is intended to compile the most frequent inquiries and offer thorough responses because it is known that unanswered questions can cause potential consumers to look for alternatives. Completely addressing consumer issues guarantees a flawless browsing experience and motivates customers to keep perusing your offers.
7. Shopify Blog Pages
A key tactic for increasing organic website traffic is content marketing. The best strategy entails regularly creating pertinent blog entries that benefit your readers and specifically address their problems.
The blog page on Shopify makes a great platform for streamlining this marketing effort. It gives a variety of display options on the page and makes it simple to arrange blog entries chronologically. A variety of tools and features that aid SEO optimization and improve the overall presentation of your articles make it easier to create and post blog content on Shopify.
8. Shopify Policy Page
An important part of any eCommerce website is its policy pages. They act as a way to give customers a thorough grasp of your terms and conditions, which is essential for lowering customer care requests. You give your customers the knowledge they need to make wise decisions and confidently navigate their purchasing experience by detailing your refund, return, exchange, and shipping policies in detail.
How to Add Content Pages on Shopify
Step 1: Log in to Your Shopify Admin
Let’s get started by logging into the Shopify dashboard first. Simply go to shopify.com and click Log in if it isn’t already bookmarked.
You must register on Shopify and build your first Shopify store if you don’t already have one.
Step 2: Go to Online Store > Pages
Once you’re in the Shopify admin dashboard, select Online Store from the left sidebar.
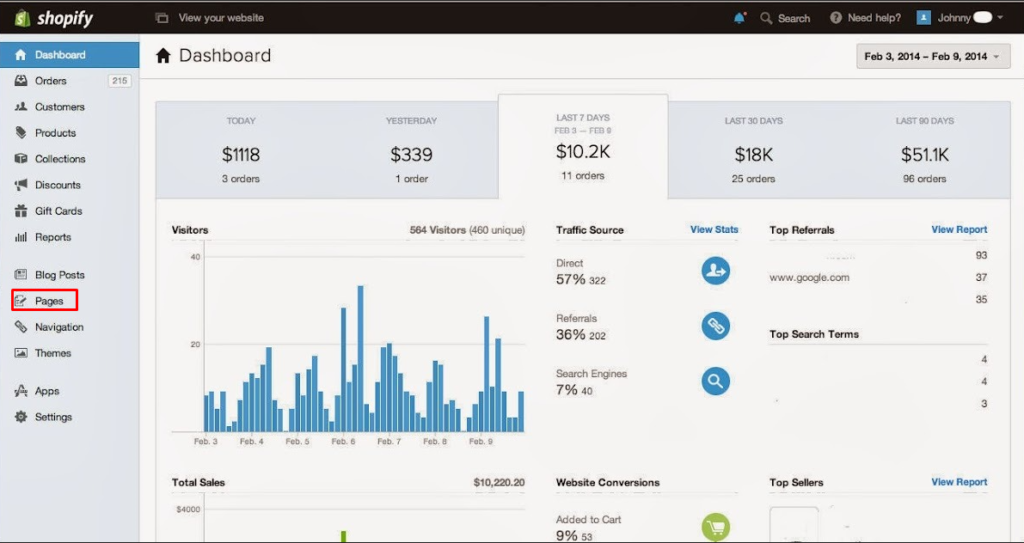
Choose Pages from the dropdown option under Online Store. You may manage your current pages and add new ones under the Pages section by doing this.
There is a helpful button that says “Add page” at the top right corner of the page.

When you click that button, the page creation screen will appear.
Step 4: Set Up Your New Page
You may now start the process of adding a page to your Shopify store. Enter the title first, then fill out the blanks below with the rest of the page’s content.
Although you should already be certain of the type of page you’re making by this point (contact us, sizing chart, FAQs), Shopify provides useful recommendations in the blank title area.
Additionally, you can decide on a theme template that coordinates with your present Shopify theme and any related apps that provide templates.
Give your new page a title in the page editor. This title ought to be accurate and evocative. You can add your page’s content after the title. To incorporate text, pictures, videos, and other objects on the page, use the content editor.
You may further customize how your page appears on search engines like Google after providing these details. The ability to alter the title, meta description, and URL handle gives you more control over your SEO efforts even though your page’s title and content are automatically included. Making these changes is advised for better optimization.

Based on the title of your page, Shopify will build a URL automatically. This URL needs to be edited to make it more keyword-rich and succinct. The handle, which is the final component of the URL, is also editable.
Both the meta title and meta description should contain pertinent keywords and offer a succinct synopsis of the information on your page. In accordance with Google recommendations, your meta title should be no longer than 65 characters and your meta description shouldn’t be more than 160.
Step 5: Set Page Visibility and Publish
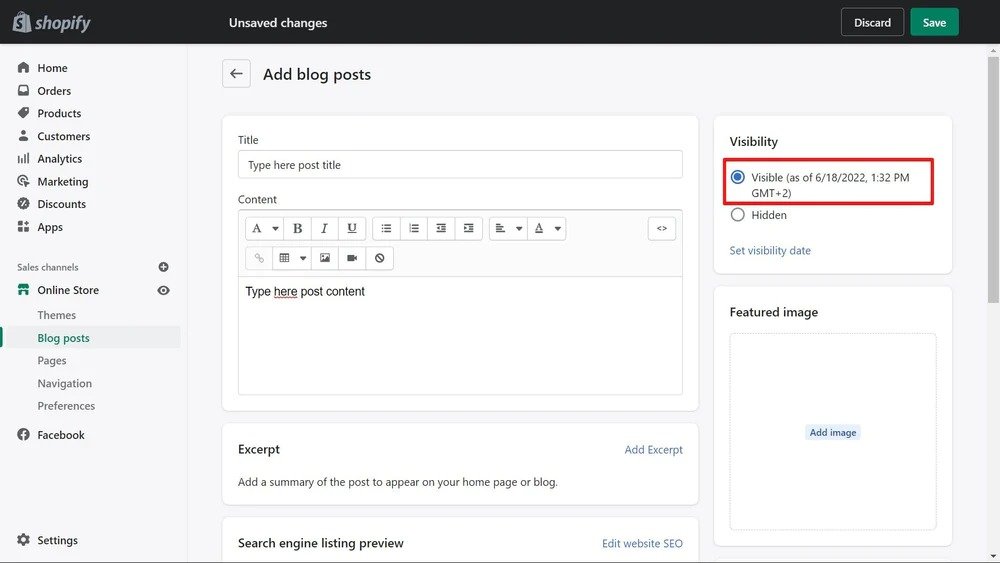
Last but not least, you have the choice of making your page on your store Visible or Hidden.
Normally, it will appear visible right away once you save your page. By choosing Hidden and entering the publication date, you can also plan for it to become visible at a later time.
Click the Save or Save and View button to save your new page once you have filled out all the required fields and are happy with the content. Your Shopify website now includes your page.
After learning how to add a page to your Shopify store, you may further alter its design using Shopify themes and advertise it through the homepage, menus, or marketing campaigns of your website.
How to Add a Collection Page on Shopify
Collection pages are produced through the creation of new product collections, just like product pages. Collections are groups of products arranged in accordance with your unique criteria, such as items labeled as knits, items priced to be given as gifts, or a freshly introduced product line. Collections can be put together manually by adding products one at a time, or automatically using preset rules.
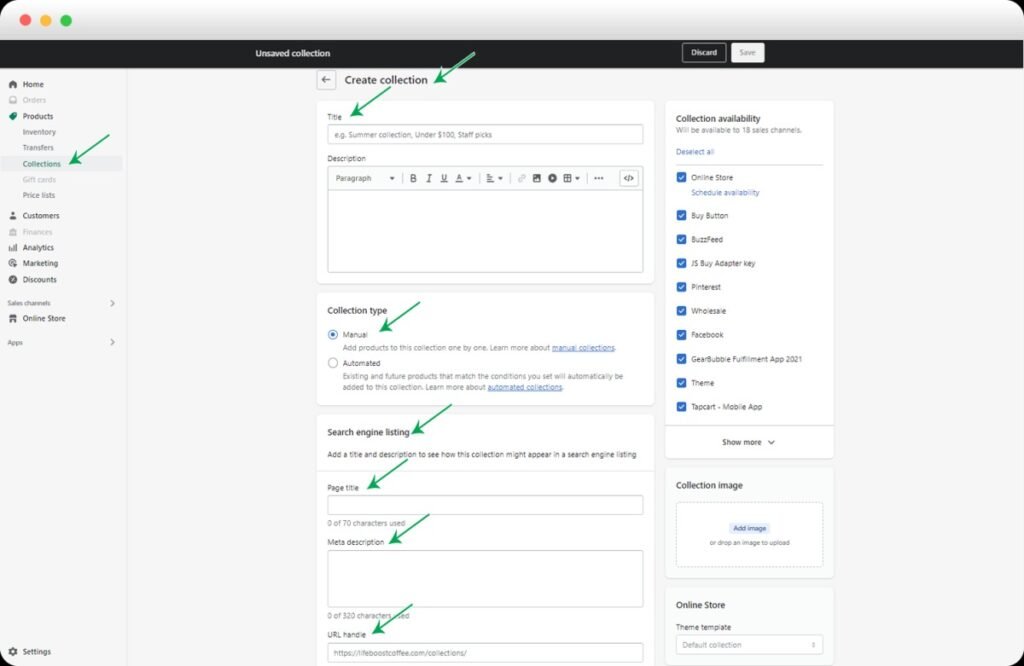
These selected product groups are displayed on Shopify collection pages. They include a header background image that is optional, a title, and a description. Shoppers who want to find the desired things quickly can browse collection sites rather than search through individual product pages. For instructions on adding a collection page, read on:
- Click on Products in the left sidebar of your Shopify admin panel.
- To manage your collections and make new ones, select Collections from the Products area.
- Click the Create Collection button to add a new collection.
- The name of the collection will make it easier for to customers which products are featured.
- You can manually add products to your collection or create automatic criteria based on product parameters like tags, vendor, price, or type to populate it.
- Choose a theme template that complements the design of your store to personalize the look of your collection page. Additionally, you can add a featured image for the collection, which will be shown at the page’s top.
- You have a choice as to how the collection’s products are arranged, including the best-seller, price, and other options. This makes it easier for customers to find what they need.
- By changing the URL handle, meta title, and meta description, you can improve the search engine optimization of your collection page. Better visibility in search results is ensured by doing this.
- After adding the required products and configuring all the necessary settings, create the collection by clicking the Save or Save and View button.
How to Add a Product Page on Shopify
Step 1: Go to Products on the Lefthand Dashboard Menu
Select Products from the left-hand menu on your Shopify dashboard.

On the left-hand menu of your Shopify dashboard, choose Products.
Step 2: Click the Add Product Button
You can add a product by selecting it from the Products section. To start creating a new product page, click this button.
Step 3: Add Product Title, Description, and Images
When you get to the product detail page, the Title, Description, and Media sections will be there.
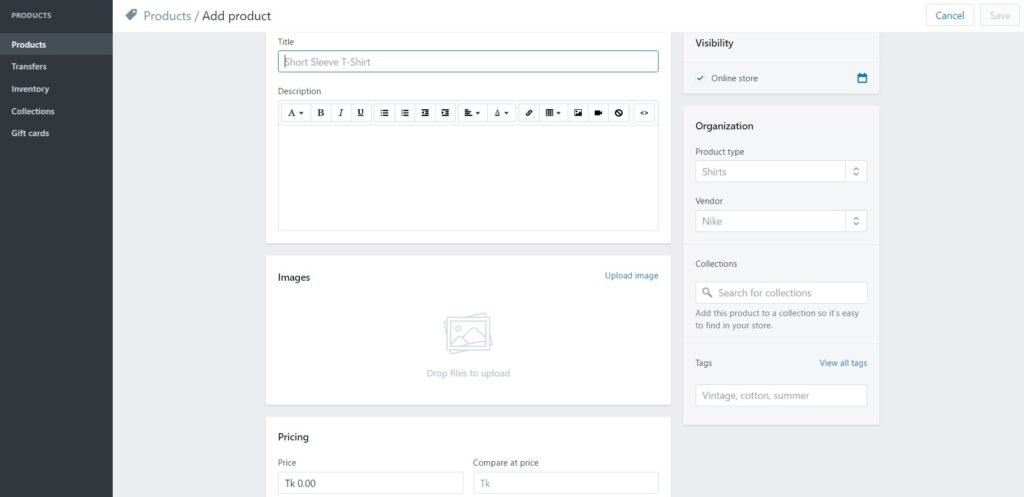
Start by putting the name of your product in the title field. Then, write an engaging product description, add enticing product images and other media, and encourage them to click the “buy” button.
- Title: Give your product a succinct, descriptive name.
- Description: Write a thorough product description that highlights its features, advantages, and any other pertinent details.
Images and Videos: Uploading professional photos and videos of your product will help you to effectively market it.
Also Read – How to Create a High-Converting Product Page on Shopify?
Step 4: Enter All Your Product Details
Paying close attention to every last detail is essential to selling your products. These details help with product organizing, inventory control, calculating shipping costs, and many other crucial aspects of your online business. Here is a thorough list of the details you may include in your product data to speed up the selling process:
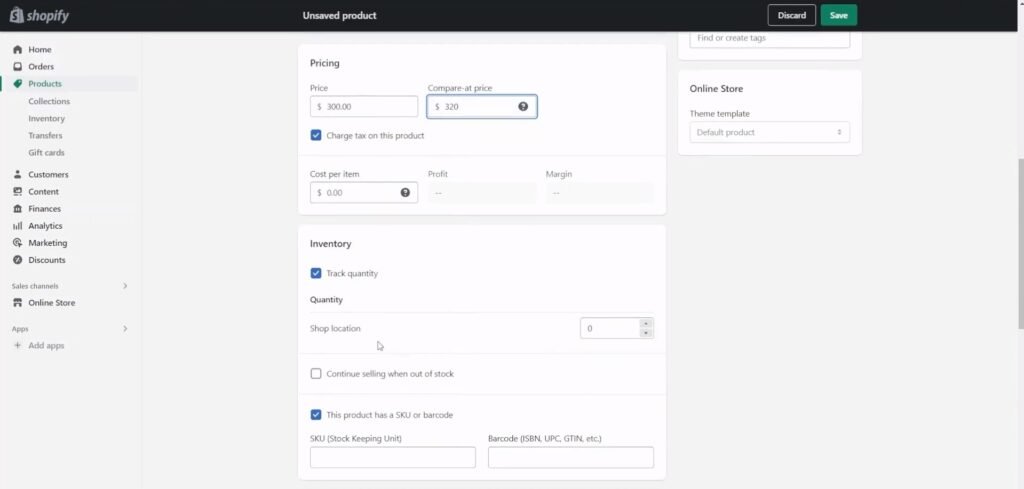
- Pricing: Establish your product’s pricing, taking into account any variants or alternatives.
- Inventory: Keep track of the stock of your product by indicating the quantity on hand.
- Shipping: Configure shipping choices, if necessary, including weight and dimensions.
- Variants: Create variants with their own prices and inventory levels if your product is available in a variety of variations (for instance, sizes and colors).
- Tags: Add appropriate tags to your product to categorize it for quick searching.
- SEO: By including a meta title, meta description, and URL handle, you can improve the search engine optimization of your product page.
- Collections: For better organizing, place the product in the appropriate collections or categories.
Step 5: Configure Page Visibility and Publishing
Select the product’s Active or Draft status. Customers can see a live product, but not a draft. If you wish to plan for the product to go live at a specified time, choose a publishing date.
After entering all the essential product information, save your newly created product page by selecting Save or Save and View. The item is currently included in your Shopify store.
How to Customize Shopify Pages
1. Utilizing the Shopify Theme
These are essentially templates that Shopify retailers may use; they come in paid and free versions. They are used to customize a Shopify store’s look and features. These themes offer a variety of consumer experiences and are made to be responsive across all devices. You can choose from a number of filter and search options. We advise categorizing themes by “free” and trying out a few that seem appropriate for your store.
Simply choose Start with this theme after clicking the preferred theme, giving it a try if you’d like. To add the theme to your store, follow the on-screen instructions and fill out the boxes.
Now, access your Shopify admin as seen above, go to online store > themes, and select the theme from the list of options on the right.
Try out different free themes to see how they affect your store and find the one that works best for you. Paid themes often provide a wider variety of possibilities and can be tailored to particular sectors and objectives.
2. Using the Shopify App
The functionality and design of your Shopify store pages can be greatly improved by customizing them using Shopify applications. Here is some guidance on how to customize using Shopify apps:
- Shopify App Store: Browse the Shopify App Store to find apps that let you customize your store page. Shogun, GemPages, and PageFly Shopify Page Builder are a few well-liked alternatives.
- Download the app: Click on the app you think will serve your requirements the best. Then, to start the installation process or test the app before adding it to your live shop, click the Install or View demo button.
- App Configuration: To link the app with your Shopify store, follow the setup instructions provided by the app. Usually, this entails giving the required rights and linking the app to your Shopify account.
- Access the App: Access the app from your Shopify admin dashboard or the Apps area once it has been installed and configured.
Also Read – How Much Does It Cost to Create a Shopify eCommerce Store in 2023?
Conclusion
Making a user-friendly and informative online store on Shopify requires you to add and change pages. You will have the skills and resources required to expertly add pages to the Shopify store by following the step-by-step instructions and integrating the suggested best practices discussed previously. It takes all of your technical know-how and customer service expertise to further modify your Shopify store pages and elevate them to a higher level. In this situation, it is advised to consider using the services of a professional Shopify website development company for optimal results and a seamless online shopping experience.
FAQs
1. Why do I need to add pages to my Shopify store?
Adding pages to your Shopify store is essential for providing vital information to your customers. It allows you to create an informative and user-friendly experience, giving shoppers details about your business, policies, and more.
2. What types of pages should I consider adding to my Shopify store?
You should consider adding pages like an “About Us” page to introduce your brand, “Contact Us” for customer inquiries, “Privacy Policy” and “Terms of Service” for legal compliance, and product-specific pages for in-depth descriptions.
3. How do I create and customize pages on Shopify?
To create and customize pages on Shopify, go to your admin panel, click on “Online Store,” and then “Pages.” From there, you can add, edit, and organize pages using the built-in editor. You can also use themes and templates to match your store’s style.
4. What should I include on my “About Us” page to make it engaging?
A compelling “About Us” page should include your brand’s story, values, mission, and a touch of personality. You can also add images, videos, or testimonials to make it more engaging and relatable to your customers.
5. Is it possible to add pages to my Shopify store without any coding knowledge?
Yes, you can create and customize pages on Shopify without coding knowledge. Shopify’s user-friendly interface and various themes make it easy for anyone to add and edit pages with minimal technical skills.

